It was a calm Sunday morning, and the kitchen seemed to sing with the earthy aroma of roasted cumin and the gentle sizzle of ghee.. My grandmother smiled as she poured a ladle of golden batter onto her hot iron tawa. “This,” she said, “is not just breakfast—it’s energy for the whole day.”

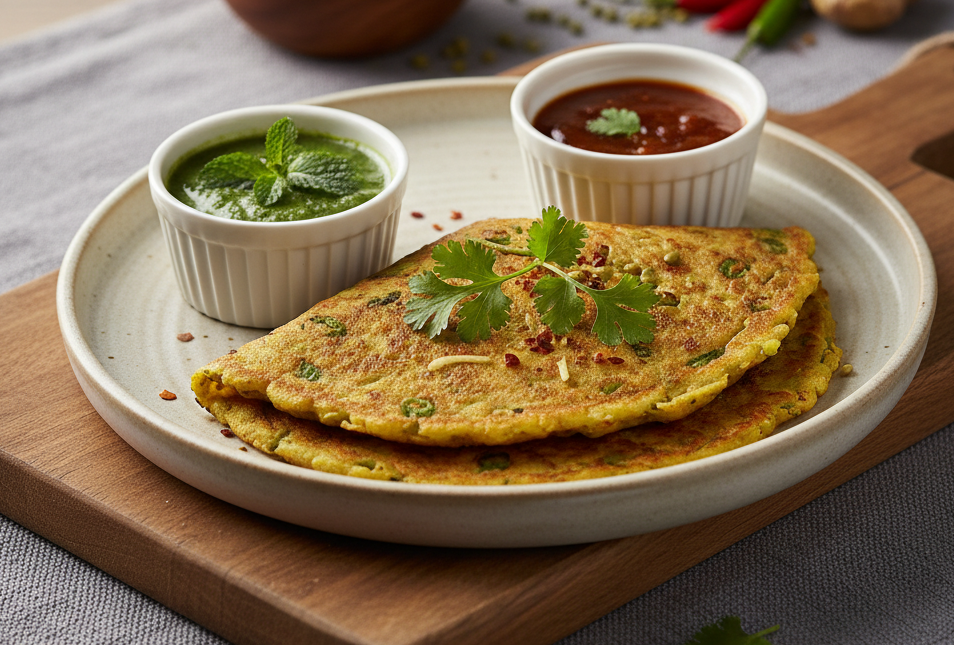
That was my first introduction to Moong Dal Chilla—a crispy, savory Indian pancake that’s both delicious and nourishing. That was my first introduction to Moong Dal Chilla—a crispy, savory Indian pancake that’s both delicious and nourishing.
Over the years, this humble dish has become my go-to when I crave something light yet satisfying. It’s protein-rich, fiber-packed, vegan, and gluten-free, making it perfect for anyone looking for a wholesome meal. The best part? All it takes is a few simple ingredients and a touch of love to bring it together.
Table of Contents
ToggleAbout chilla
chilla, also known as cheela, is a traditional Indian pancake made from lentils or gram flour (besan). It’s a savory dish unlike the Western pancakes and can be customized with spices, herbs, and chopped veggies for extra flavor.
There are different types of chilla made across India — besan chilla, moong dal chilla, oats chilla, and even suji chilla — each with its own taste and twist.
About moong dal chilla
If you’re searching for a healthy Indian breakfast that’s light, nutritious, and easy to make, look no further than Moong Dal Chilla. Made from soaked yellow lentils (moong dal), this protein-rich pancake is a perfect start to your morning. It’s crispy on the outside, soft inside, and full of earthy flavors that instantly lift your mood.
Unlike heavy breakfast options, Moong Dal Chilla keeps you full for longer without weighing you down. It’s naturally gluten-free, high in protein, and packed with essential nutrients making it an ideal meal for fitness lovers, busy mornings, or anyone trying to eat clean.
Whether you enjoy it with mint chutney, curd, or even roll it up with paneer, this healthy breakfast recipe is a delicious reminder that good food doesn’t have to be complicated just made with love and the right ingredients.

Ingredients You’ll Need
For the batter
- 1 cup yellow moong dal – soaked 3–4 hours (or overnight for breakfast prep)
- 1–2 green chilies (adjust spice as you like).
- 1-inch piece ginger, peeled & roughly chopped.
- ¼ tsp red chili powder.
- 1tsp Salt to taste.
- Water – just enough to blend.
Optional flavor boosters
- 1 medium onion, finely chopped.
- ¼ cup coriander leaves, finely chopped.
- A pinch of asafoetida (hing).
For cooking
Oil or ghee for greasing the pan.

Step 1: Rinse the Moong Dal
Take 1 cup of split yellow moong dal and rinse it 3 to 4 times in clean water to remove any impurities or excess starch.

Step 2: Soak the Dal
Add the rinsed moong dal to a bowl with 2 to 3 cups of water.
Soak it for about 3 to 4 hours or until the lentils turn soft and plump.

Step 3: Drain the Water
Once soaked, the moong dal will swell and double in size.
Drain all the water completely using a strainer.

Step 4: Grind the Dal
Transfer the soaked dal to a grinder or blender jar.
Add ¼ cup of water and grind to a smooth, fine batter.
If needed, add 1–2 tablespoons more water gradually — not all at once — for easy grinding.

Step 5: Add Spices
Pour the ground batter into a mixing bowl and add:
- ¼ tsp turmeric powder
- ¼ tsp red chili powder
- ½ tsp roasted cumin powder
- 1 tsp salt (or as needed)

Mix everything well until the spices blend evenly into the batter.
Step 6: Prepare the Fresh Ingredients
Finely chop the following:
- ¼ cup coriander leaves
- ¼ cup onions
- 1 tsp grated ginger
- 1–2 green chilies (about ½ to 1 tsp finely chopped)

Step 7: Mix in the Chopped Ingredients
Add all the chopped coriander, onion, ginger, and green chilies into the spiced moong dal batter. Mix well so that everything combines evenly.

Step 8: Add Asafoetida (Hing)
Add a pinch of asafoetida (hing) to the batter and stir again.
This adds aroma and helps with digestion.

Step 9: Rest the Batter
Let the batter rest for 15 to 20 minutes. During this time, the onions will release moisture, slightly changing the texture of the batter.

Step 10: Adjust the Consistency
After resting, check the consistency. If it’s too thick, add 1–2 tablespoons of water — just enough to make it medium and pourable. Avoid adding too much water, or the batter won’t spread well on the tawa.

Serve Hot & Fresh
Serve your hot chillas with mint chutney, tomato ketchup, or a bowl of curd. You can even stuff it with paneer or cheese for a twist.

Expert Tips for Perfect Moong Dal Chilla
- Soak Properly- Always soak moong dal for at least 3 to 4 hours. This helps the lentils soften and blend smoothly, giving your chillas a light and fluffy texture.
- Don’t Add Too Much Water- While grinding, add water little by little. The batter should be thick yet pourable — not runny. A thin batter won’t hold shape on the pan.
- Rest the Batter- Let the batter rest for 15–20 minutes before cooking. This allows flavors to blend and onions to release moisture, improving texture and taste.
- Use a Hot and Seasoned Pan– Always make sure your tawa or pan is well-heated before pouring the batter. A hot surface ensures the chilla spreads evenly and becomes crisp.
- Cook on Medium Flame – Avoid high heat — it can brown the chilla too fast without cooking the inside properly. Medium heat gives even cooking and perfect crispness.
- Grease the Pan Lightly- Whether you use a cast-iron or non-stick pan, grease lightly with oil or ghee before each chilla. This prevents sticking and adds a lovely flavor.
- Adjust Consistency When Needed– If your batter thickens after resting, add 1–2 tablespoons of water to bring it back to medium consistency. Stir well before each use.
- Get Creative with Fillings- You can stuff your chilla with paneer, cheese, or sautéed veggies for a more filling meal. It’s a great way to make it lunchbox-friendly too!
- Make It Healthier –
Add grated carrots, spinach, or beetroot to the batter for extra nutrients and color. These veggie-loaded chillas are perfect for kids and fitness lovers. - Serve Fresh and Warm- Moong Dal Chillas taste best when served hot off the tawa with chutney, ketchup, or curd. They lose crispiness if kept for too long.
🙋♀️ FAQs
- Can I skip soaking?
No, soaking is essential for smooth batter and better digestion.
- Which moong dal should I use?
Use whole green moong dal or split yellow. Both work, though texture will vary.
- Is this recipe vegan and gluten-free?
Yes! Just ensure your hing is gluten-free.
- Why don’t my chillas spread well?
Either the batter is too thick, the pan is not hot enough, or you added too much water.
- Is it diabetic-friendly?
Absolutely. Moong dal has a low GI and supports steady blood sugar levels. Just use minimal oil.
Final Thoughts
Making Moong Dal Chilla feels like blending tradition with modern health goals. It’s simple, quick, and endlessly versatile. Whether you’re serving it as a comforting breakfast, a protein-packed brunch, or a light dinner, one thing is guaranteed—once you try it, you’ll come back to it again and again.


